Spotlight on Games > War Games > Translations
Translation
March 18, 2013
Chronicles of the Three Kingdoms
Table of Contents
1.0 Preface
2.0 Game Components
3.0 Start of the Game
4.0 The Round/Season
5.0 Collect Tax Phase
6.0 Preparation Phase
7.0 Trading Phase
8.0 Action Phase
9.0 Battle Preparation Phase
10.0 Battle Phase
11.0 Resolution Phase
12.0 Completion Phase
13.0 Diplomatic Relations
14.0 Influence
15.0 Human and Non-human Players
16.0 Exile
17.0 Choosing Leaders
18.0 Additional Counters
19.0 Basic Strategies for Each Leader
Errata:
  • Map
  • Counters
  • Cards
  • Counters Explanation
  • Translated from Chinese by Yeo Keng Leong and edited by Rick Heli.

    1.0 Preface
    Chronicle of the Three Kingdoms is a war game based on the Three Kingdoms era. The game can support 3 to 7 players. Each picks from the roles of Cao Cao, Yuan Shao, Sun Ce, Liu Bei, Liu Biao, Liu Zhang and Ma Teng. During the game, players pit their wits against one another, managing military, economy, political and diplomatic matters. The player who manages these the best will win the game.

    The above is a short summary of the game. Do not be concerned if you have not tried war games before. Read through the rules carefully and try the game with a few friends. You will find that the rules are not overly complicated. For experienced war gamers, the simple types of counters in this game do not affect the flow or depth of the game. Instead, they serve to help you understand the Three Kingdoms era.
    If you have any questions regarding the game, do write (include return envelope and postage) to us or call us. Our association has dedicated personnel to reply to your queries. Contact us at
    https://www.wargames.com.hk (Hong Kong).

    1.1 Remarks on Terminology
    For ease of explanation, 
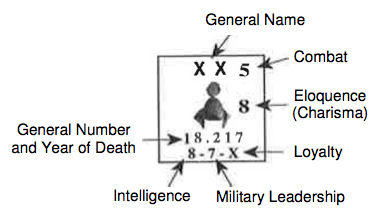
all those having leadership roles are referred to as leaders and their daughters are referred to as princesses. This does not reflect the actual terminology of the Three Kingdoms era.

    2.0 Game Components
    Each set of Chronicles of the Three Kingdoms contains:
    1 map
    70 cards
    3 sheets of counters
    1 set of rules
    1 six-sided die

    2.1 Map
    The map shows all the territories of the Eastern Han dynasty. The solid black lines denote the boundaries of a state or province. These will be referred to as territories in this set of rules. There are 20 territories. Each territory contains up to 3 areas, denoted by the dashed lines.

    To occupy a territory, all areas in that territory have to be occupied.

    The orange horizontal line running across the middle of the map indicates the border between the northern and southern parts of China. This border only comes into play during battles (see 10.2 Terrain and the Battle Outcome Table). The various sections outside of the map, known as the leader information tables, contain information regarding the starting positions of each king, diplomatic relations numbers etc.

    2.2 Cards
    There are two types of cards in the game: territory cards and player cards. There are 20 territory cards, each containing information pertaining to the 20 territories. There are also 50 player cards. These are drawn during gameplay by players. Players are reminded not to confuse one for the other.

    1. Territory Cards

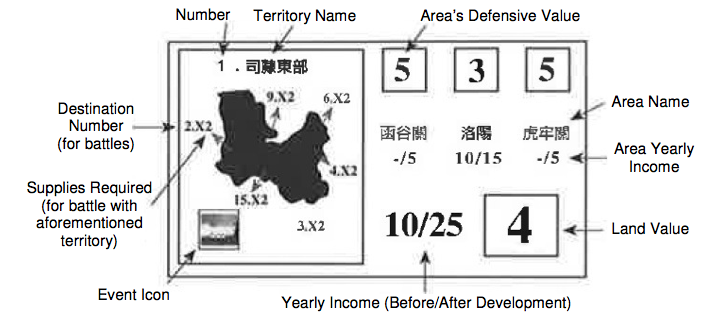
    Area’s Defensive Value – The size and defensive strength of the area. When the defender chooses to defend the city/fortress during battle, this value gives the defender an advantage.
    Area’s Yearly Income – This indicates the importance of the city and affects the income and land value. (See also 5.0)
    Land Value – The higher the Land Value, the more difficult it is to develop the territory. The territory is fully developed when the Land Value becomes 0
    Yearly Income – The number on the left indicates the annual income if the territory has not been developed yet. The number on the right indicates the annual income after the territory has been developed.
    Supplies Required – Reflects the difficulty in delivering supplies due to terrain. The number indicates the amount of gold required.

    Event Icon – Different territories contains different event icons. The icons and what they stand for are as follows:
    Flood may occur in this territory.
    Foreign invasion or incursions by border tribes may occur in this territory.
    May recruit Level 1 cavalry unit in this territory.
    May recruit Level 1 naval unit in this territory.
    May recruit Level 2 naval unit in this territory.

    2. Player Cards
    The player cards come in two colours. Black cards are event or disaster cards. When drawn, the event is resolved immediately and the card may not be retained. Red cards are strategem cards. These may be retained for use during battles.

    When event cards are drawn, it is important to note the player/leader affected and the timing of the event. If the player/leader drawing the card is not the player/leader indicated on the card, or if the time period has not reached that indicated on the card, the event card is placed on the discard pile.

    If the event occurs or has already occurred when the event card is drawn, then the event card may be removed from the game. For this latter case, the player may instead place the event card in the discard pile, so that this event card may be drawn again by players. It is important to note the difference between placing the event card on the discard pile and removing it from the game.

    When disaster cards are drawn, the affected player/leader must pick a randomizer counter (see 2.3 point 5). The number on the randomizer counter indicates which territory may be affected by the disaster. If the disaster card’s icon is the same as that on the territory card, then the territory is affected by the disaster. Some of the disaster cards do not carry icons, and these disasters always occur when drawn. There are other disasters, e.g. earthquake, drought, that are time-dependent and require matching of timing of the event to the current time.

    For example, suppose the flooding disaster card and the 6 randomizer counter were drawn. The territory numbered 6, Yi Zhou, displays the flooding icon. The flooding event therefore affects Yi Zhou. All disasters, with the exception of flooding, cannot be prevented. For flooding, throw a D6 and reduce the result from the territory’s flood prevention value. If the flood prevention value drops to 0 or below, flooding occurs.

    If there are two or more players/leaders occupying different areas of the territory, roll a D6 to determine where the loss occurs. The loss occurs on the east side for 1-3 and west side for 4-6.

    Stratagem cards may be retained for use in battles. There is a maximum hand limit of 4 for strategem cards. This hand limit applies only at the end of every round/season. The affected player/leader chooses which strategem card(s) to discard (see 10.3 point 4 for use of strategem cards).

    2.3 Counters
    There are 5 types of counters: generals, armies, actions, objects and randomizers.

    1. General Counters
    Each general counter represents one general. On each counter are attributes relating to the general, such as intelligence, military leadership, loyalty, combat and eloquence (charisma). Below some generals’ names are some numbers (either in brackets or without). The numbers in brackets represents the year in which this general appears. As for the numbers without brackets, the number on the left represents the general number and the number on the right represents the year of death of this general.
    General Name – Name of the general
    Combat – Used during battles (see 10.3 point 5)
    Eloquence – Used during battles and when conducting diplomatic relations (see 10.3 point 11 and 11.0 point 5) Loyalty – Used when conducting diplomatic relations (see 11.0 point 5)
    Military Leadership – Used during battles (see 10.3 point 6)
    Intelligence – Used during domestic development and playing of strategies (see 10.3 point 4 and 11.0)

    2. Army Counters
    There are three types of armies. Each army type performs differently depending on terrain type.

    Infantry: Stronger on mountainous terrain. The most basic army unit.
    Cavalry: Level 1 or 2. Stronger on flat terrain, but weaker on all other terrains.
    Naval: Level 1 or 2. Stronger on rivers, but weaker on all other terrains.

    The number on the army counter indicates the number of such army units. For example, 5 indicates 5 such units.

    3. Action Counters
    There are 7 types of action counters. Other than the Battle and Recruit Armies actions (object counters), the other 7 action types require action counters before they can be taken.

    1. Every player draws 3 counters (action or object counters) at the start of every round.
    2. Action counters can be traded with other players or used during the trading phase (see 7.0).
    3. At the end of every round, all action counters are returned to the general supply and may not be retained for the following round.
    4. There is no limit on the number of action counters that can be used in a round. The number of actions counters depend on the number of generals and the outcome of trading, if any (see 7.0 and 8.0).
    The types of action counters are as follows:

    Land: Develop land, decreasing own territory’s land value. Taking this action requires gold.

    Defence: Strengthen defences of city by increasing its army capacity and defensive value

    Diplomatic Relations: Search (generals), recruit (generals) and conducting diplomatic relations with other states

    Recruit Armies: Recruit armies. There is a limit on number and type of armies that can be recruited per round. Taking this action requires gold.

    Special Tax: Collecting special taxes to increase gold. There will be implications if a disaster has occurred that round.

    Espionage: Obtain information on other states, stealing objects etc. There will be implications if the espionage was unsuccessful.

    Prevent Flood: The only way to prevent a flood and its associated losses

    4. Object Counters
    There are 7 types of object counters, and a total of 14. Each player starts with 1 object counter at the start of the game. The rest of the object counters are mixed and drawn together with the action counters at the start of each round. Object counters may be retained and exchanged with other players, with the exception of the princess. Players are the owners of the objects once they are drawn. Once the object is used, they are returned to the general supply and may be re-drawn in the future. There is no limit on the number of objects each player can own.

    The 7 types of object counters are as follows:
    Image Name Value Notes

    Jade Seal

    8

    May not be used for recruiting (generals). Belongs to Yuan Shu at the start of the game. If used for Diplomatic Relations action against non-human players, the object is left on that territory. The next player to occupy that territory gains the object.

    Chitoo Horse

    6


    Princess

    5

    May not be used for recruiting (generals). Belongs to Lu Bu at the start of the game. If used for Diplomatic Relations action against non-human players, the object is left on that territory. The next player to occupy that territory gains the object.

    Beautiful Woman

    4


    Fine Horse

    3


    Treasured Sword

    2


    Guards


    May only be used against espionage or capturing of generals, and may not be used for the diplomatic relations action.

    Each object has an associated Diplomatic Relation value. It affects the success rate when taking the Diplomatic Relations action, including recruiting (generals).

    5. Randomizer Counters
    There are numbered and bad-luck counters. Numbered counters are used during Develop Land and Defence actions. Bad-luck counters are used to indicate the territory affect by disasters, and the general affected when a general dies.

    3.0 Start of the Game

    1. Open up and place the map in the middle of the table.
    2. Each player chooses a leader (see 17.0 Choosing Leaders) and receives that leader’s allocated territories, gold, general counters (same colour) and army counters (details can be found on the map).
    3. Each player collects the territory cards relating to their allocated territories to denote ownership. The rest of the territory cards are kept aside and used when those territories become occupied.
    4. Non-human players/leaders, such as Lu Bu and Yuan Shu, are also placed on the corresponding territories on the map, as denoted on the map.
    5. The jade seal and chitoo horse are placed on Yuan Shu's and Lu Bu’s territories respectively.
    6. Mix the rest of the object counters. Each player draws one at random.
    7. The remaining object counters are then mixed with the action counters, ready for drawing when required.
    8. Shuffle the 50 player cards, ready for drawing when required.
    9. Each player collects all of the general counters of their colour. Other than Zhuge Liang, Huang Zhong and Wei Yan (for Liu Bei), all generals are available for use immediately. (Zhuge Liang has not been discovered yet, whilse Huang Zhong and Wei Yan are only available during the following year).
    10. Place the year counter on 196 AD and the season counter on Spring. All players keep their counters covered and hidden from other players. The game is now ready to begin.

    4.0 The Round/Season
    The game is composed of a number of rounds. Each round is equivalent to one season, with 4 rounds/seasons making up 1 year. The game ends at the end of Winter 220 AD or whenever any player achieves overall victory, whichever occurs first.

    Each round/season is made up of 8 phases. Players may undertake each phase simultaneously and the phase ends when every player has completed that phase. During the battle phase, players take turns to resolve their battles. The battle phase ends when all battles are resolved

    4.1 Summary of Phases of Each Round/Season

    1. Collect Tax
      Occurs only during Spring of each year and does not occur during the first round of the game.
      1. Each player receives the tax income from their territories
      2. Each player calculates his own military maintenance costs and pays that amount. If there is insufficient gold to pay for the military maintenance costs, an economic collapse occurs, and army units have to be dissolved until there is sufficient to pay.
    2. Preparation
      1. Each player checks if he has any armies still engaged in battles on the map. If there are, maintenance costs for these armies have to be paid
      2. Each player draws 1 player card. Players decide on the order of drawing of cards. If the draw pile runs out, shuffle the discard pile and that forms the new draw pile
      3. If black (event or disaster) cards are drawn, these are resolved immediately
      4. If red (strategem) cards are drawn, these may be kept for trading or use in battle later
      5. If disaster(s) takes place, these have to be resolved first. Multiple disasters can be resolved at the same time
      6. Each player draws 3 counters from the mix of action and object counters. If object counters are drawn, these can be retained. If action counters are drawn, these have to be used or discarded by the end of the current round, i.e. they cannot be retained beyond the current round
    3. Trade
      1. Players may trade gold, player cards, action counters, object counters, land, armies and captured generals etc. with each other.
      2. The princess may not be traded and may only be used when conducting diplomatic relations (see 11.0 point 5).
      3. Players may not trade with other players if their diplomatic relations level with that player is 0 or 1
      4. Negotiations of trading of land and armies can only be conducted during this phase and they require certain conditions to be met before the actual trade can occur
      5. There are no limits on trading. The trading phase ends when every player ends his respective trading
    4. Actions
      1. Players place action counter(s), with general counter(s) underneath them. The general counter indicates which general is taking that action. Place the counters on the territories on the map to indicate where the action is taking place
      2. Players may place gold and/or object counters with the action and general counters. These help to increase the chances of success of the action. Note that object counters may only be placed for diplomatic relation actions.
      3. When all players complete their placement of counters, the action phase ends
    5. Preparing for Battle
      1. Players who are planning to wage war take turns to decide on invasion target(s). The territories to be invaded must be neighbouring territories sharing a border with the player’s own. Place general and army counters on the invasion target
      2. Other players may send reinforcements, general and armies and/or gold, to support the invader or defender.
      3. The above 2 points can occur simultaneously or sequentially. Players may place all, part of or none of their armies on territories (see 9.0).
      4. Calculate the amount of supplies required for the battles and pay for them
    6. Battle
      1. Both players pick from their placed generals to assign as their respective commander and vanguard. When required, another general may be assigned as the advisor
      2. The invading player may go ahead with the invasion, hold fast or retreat (holding fast postpones the invasion for one round/season while retreat ends the invasion)
      3. The defending player chooses to defend by engaging the invaders outside the city or to defend the city/fortress
      4. If the defending player chooses to defend by engaging the invaders outside the city, the battle commences. If the defending player chooses to defend the city/fortress, then the invader chooses to attack the city/fortress or to surround the city/fortress. If the invader chooses to surround the city/fortress, the invasion is postponed for one round/season
      5. When battle takes place, i.e. defenders engaging the invaders outside the city or invaders attacking the city/fortress, both players use strategem cards and calculate both sides’ military strength to decide attack/defend differentials
      6. Roll dice and decide the outcome of the battle based on the Battle Outcome Table
      7. Both players remove lost armies. If there is a need to test for sufficient morale, roll dice to resolve the test
      8. Defending player decides whether to retreat. If the defending player decides not to, the invading player then decides whether to retreat
      9. If both players decide not to retreat, repeat steps 3-7 until one player wins or retreats
      10. If a player decides to retreat, the other player may give chase. When giving chase, both players calculate their respective military strength to decide attack/defend differentials. Roll dice and decide the outcome of the battle based on the Battle Outcome Table. The chasing player will not be affected by the battle outcome unless the retreating player uses the ambush strategem successfully
      11. Both players replenish armies and this ends the battle
      Resolve all battles in the above manner.
    7. Resolution
      Determine the outcome of all action counters placed during the action phase by rolling dice. These may occur simultaneously
    8. Completion
      1. All players check whether they have more than 4 red (strategem) cards. If yes, discard down to 4.
      2. Return all action counters. If it is winter, remove all non-human players’ armies.
      3. Check if any player has satisfied the automatic victory conditions, or if it is 220 AD winter. The game ends if either condition is satisfied.
      4. If the game has not ended, then the current round/season ends. Update the year and season counters.
    Repeat steps A to H above (new round/season).

    5.0 Collect Tax Phase
    This occurs only during spring of every year, i.e. once every four rounds. Every player receives income in the form of gold from their territories. On the territory card, there are two large numbers separated by a “/”. These represent the yearly income before and after full development respectively for the entire territory. If a player occupies only some of the areas of a territory, then refer to the two smaller numbers, also separated by “/”, for each area. As before, these represent the yearly income before and after complete development respectively for the area.

    1. If the land value is 0, the territory is fully developed and the player receives income equal to the number on the right of “/”. If the player only occupies part of the territory, i.e. not all of the areas, he may not receive income equal to the number on the right of “/”. (see 8.1).
    2. Each player must announce the amount of income collected to all other players
    3. Each player calculates the amount of military maintenance cost required. Each infantry unit requires 1 gold and each cavalry and naval unit requires 2 gold. Reduce the income collected by total military maintenance cost.
    4. If there is insufficient gold to meet the military maintenance, an economic collapse occurs. Affected player(s) must dissolve army units (affected player’s choice) until there is just sufficient to pay.
    5. Players who suffered an economic collapse will have his Influence reduced by 2.
    6.0 Preparation Phase
    This phase involves mainly the drawing of player cards and action counters, as well as resolving disasters and events.

    Army units still engaged in battles (holding fast in an invasion or involved in the surrounding a city/fortress) will still be on the map. These army units require maintenance costs. The procedures for payment of maintenance costs are the same as that listed under 5.0, points 3 to 5. [I believe all armies incur maintenance costs only once a season. The military maintenance costs listed in 5.0 are for armies not in hand, and not on the map. – translator]

    6.1 Disasters
    There are 7 types of disasters in the game, excluding war. Some may happen all year round, whilse others may only occur in certain seasons. The disasters are as follows:

    Disaster

    Territories where disaster may occur

    Seasons when disaster may occur

    Effect of disaster on gold/land

    Note

    Plague of Locusts
    1-20
    All year
    1 D6 throw
     
    Earthquake

    1-20

    All year
    +1
     
    Plague

    1-20

    Spring, summer and autumn
    1 D6 throw + 2
     
    Drought

    1-20

    Summer and autumn
    2 D6 throws + 1
     
    Flood

    1-20 + icon

    Summer and autumn
    1 D6 throw + 1
    Roll 1 D6, subtract the outcome from the territory’s flood prevention value. If the flood prevention value drops to 0 or below, flooding occurs
    Bandits

    1-20

    All year
    -
    Same as war
    Incursion by Border Tribes

    1-20 + icon

    All year
    -
    Same as war

    1. When a disaster card is drawn, the drawing player checks the season in which the disaster may occur. If the disaster may not occur, discard the disaster card and it has no effect.
    2. If the disaster may occur in that season, draw an bad-luck counter. The number on the bad-luck counter is the territory affected by the disaster. If the number drawn is 21-28 or “Draw 2”, redraw.
    3. If the chosen territory does not belong to any player, nothing happens and the disaster card is discarded.
    4. If the chosen territory does not contain the icon required for the disaster to occur, i.e. flood or incursion by border tribes (see the territory cards), nothing happens and the disaster card is discarded.
    5. Affected territories suffer losses as shown in the table above (also indicated on the disaster cards).
    6. For the bandits and incursion of border tribes disasters, resolve it as a battle.
    6.2 Events
    Events cards reflect certain events that took place during the Three Kingdoms era, e.g. major events such as secret blood decree and minor events such as manpower shortage. Some events include the year and the leaders involved. The details of the events are as follows:

    No.

    Event Name

    Year

    Leaders involved

    Effect

    1
    Secret Blood Decree from the Han Emperor

    198 AD and after
    All
    Cao Cao as invader does not reduce Influence
    2

    Attack on Xu Zhou

    -
    Liu Bei
    Lu Bu’s military strength is equal to 2 D6 throws
    3

    Death of Sun Ce

    200 AD and after
    Sun Ce
    Throw D6 to determine outcome
    4

    Fake Emperor Yuan Shu

    197 AD and after
    All
    Player who defeats Yuan Shu earns +2 Influence, and -1 for all Diplomatic Relations
    5

    Xi Liang’s Invasion

    211 AD and after
    Occupier of State Number 2
    Military strength of incursion is equal to 3 D6 throws
    6

    Xun Yu, Xun You

    212 AD and after for Xun Yu
    214 AD and after for Xun You
    Cao Cao
    Remove the general counter(s) from the game
    7

    Manpower Shortage

    -
    All
    Recruitment of army cost doubles
    8

    Fall of a Star

    198 AD and after
    Pick Bad-luck counter 1-28
    Chosen general’s counter is removed from the game
    9

    Three Personal Visits

    206 AD and after
    Liu Bei
    Zhuge Liang joins Liu Bei
    10

    Tun Tian System

    -
    All
    Land development action doubles
    1. If an event card is drawn, the player who drew the card checks the year in which the event may occur and whether he is the leader listed on the card. If either is not satisfied, discard the event card and it has no effect.
    2. If the event takes place, follow the instructions on the event card.
    3. For the Fall of a Star event, draw an bad-luck counter and look for the general counter with the same number. Compare the current year with the year of death indicated on the general counter. If the current year is equal to or later than the year of death indicated, the general passes away. Otherwise, discard the event card.
    4. For the Tun Tian System event, the player who drew the card may, for the current round/season only, send 2 generals to take the develop land action, provided he has the land action counter. Gold still needs to be paid for both generals (This is the only way to develop the same territory’s land twice in the same season. Player may also develop two separate territories via this method).
    5. For the Death of Sun Ce event, if Sun Ce dies, then Sun Quan takes over as the new leader.
    . Descriptions of each event are provided on the leader cards.

    7.0 Trading Phase
    This is one of the most important phases of the game. During this phase, players may exchange any item with one another, including gold, player cards (strategem. cards), action counters, object counters, land, armies and prisoners (captured generals).

    1. There is no limit on the number of trades and size of trades.
    2. The princess may not be traded and may only be used when conducting diplomatic relations (see 11.0 point 5).
    3. Players may not trade with other players if their diplomatic relations level with them is 0 or 1.
    4. Direct trading of land is not allowed. However, negotiation and agreement can be achieved during this phase on land trades. For example, the “invader” sends out an army to take over the land during the battle phase, pays for the land thereafter etc. The terms of the payment and take over are decided by the players involved. There are no limits on such trades (The selling party do not lose Influence points for land sales, as it is not considered a loss).
    5. Direct trading of armies is not allowed. However, negotiation and agreement can be achieved during this phase on army trades. The buying player uses a diplomatic relations action counter on the selling player’s territory and pays for the armies. The terms of the payment are decided by the players themselves. There are no limits on such trades. Upon receipt of the armies, the buying player needs to pay the basic level of supplies required, i.e. 1/2 gold for every infantry unit (rounded up), 1 gold for every cavalry and naval unit.
    6. Generals may not be traded. Generals who are captured during battles (prisoners), or captured while carrying out actions (see 8.4 points A and C), can be traded. Players may only trade with the original employer/leader of the general. If a player release captured generals without condition, his Influence increases by 1.
    7. When all players have completed their trades, the trading phase ends.
    8.0 Action Phase
    There are 7 types of action counters. Also, the Guards object counter acts like an action counter. Action counters are used mainly for domestic affairs, though players should not forget about diplomatic relations and espionage. Place desired general counter(s) together with action counter(s) on the territories on the map (or on the territory cards) where you would like to take the action. The actions will be resolved during the resolution phase. (For the special Tax and Recruit Armies actions, place the action and general counters to one side).

    8.1 Land
    Developed land is the basic pillar of a state’s economy, and developing land is therefore of prime importance. It is also the only action that requires payment of basic costs. On the bottom right corner of the territory card is the land value of that territory. The higher the land value, the longer and more expense required to develop.

    1. A player may take the land action to develop a territory only after he has annexed the entire territory (e.g. if there are three areas in the territory, all three areas have to be annexed).
    2. For each territory, the land action may be taken only once per round/season (exception being Tun Tian System event, see 6.2 point 4).
    3. When the land action is taken, pay gold equal to the current land value (e.g. if the current land value is 4, then 4 gold is required). The gold paid is not refundable, regardless of success or failure.
    4. The player may pay extra gold to improve the chances of success.
    5. If the land action is successful, the land value decreases by 1 (e.g. 4 becomes 3). If the land value decreases to 0, the territory’s land is fully developed. During tax collection at every spring, the player receives income equal to the number on the right of “/”. The player’s Influence is also increased by 1 immediately after the land is fully developed (one time increase).
    8.2 Prevent Flood
    The prevent flood action helps to reduce the losses due to flood. Though its impact is modest, it should not be overlooked.
    1. The prevent flood action may only be taken on territories with the possibility of flood icon (above).
    2. For each eligible territory, the prevent flood action may be taken only once per round/season
    3. The player may pay extra gold to improve the chances of success
    4. If the prevent flood action is successful, add 1 flood prevention point to the territory’s event icon.
    5. When the flood disaster occurs on the territory, throw 1 D6. Reduce the outcome by the number of flood prevention points. If the flood prevention points are reduced to 0 or less, the flood will affect the territory. The flood prevention points do not return to their pre-flood levels (if the flood prevention points is 5, and there is a throw of 5 or 6, the flood affects the territory. If there is a throw of 3, the flood prevention points are reduced to 2, and the flood does not affect the territory)
    8.3 Defence
    Defending one’s city/fortress is vital during battles, though it is not easy to succeed. The higher the defence value, the more army units the city/fortress can hold (e.g. if the defence value is 5, the city/fortress can hold up to 5 army units of any type)
    1. For eligible territories, the Defence action may be taken only once per round/season.
    2. The player may pay extra gold to improve the chances of success.
    3. If the Defence action is successful, add 1 point to the territory’s defensive value.
    4. When the city/fortress is under attack, and the invader throws a 12 (not including any adjustments to throws), the city/fortress’ defensive value reduces by 1.

    8.4 Diplomatic Relations
    Diplomatic Relations is a very important action. The Diplomatic Relations counter may also be used to search or recruit generals. Players may also use object counters to improve the chances of success. Details are as follows:

    1. Diplomatic Relations
      Within each leader's information table are tables indicating the leader's diplomatic relation level with every other leader. The higher the level, the more friendly the relationship. One of the uses of the diplomatic relations counter is to improve diplomatic relations with another leader.
      1. There are no limits on how many diplomatic relations counters can be used on the same territory or leader.
      2. Place a general counter with diplomatic relations counter on the territory (on the map) for which leader the player wishes to improve relations with. If there are other leader's territories between the player's own territory and target leader's territories (non-human players excluded), the third player may place the guards object immediately to try and capture the general taking the action.
      3. The general taking the action may not be captured by the target leader.
      4. If the general taking the action is not captured, and therefore safe, the general counter remains on the map. The action will be resolved during the resolution phase.
      5. The player may pay extra gold or objects to improve the chances of success. Other players may also pay gold or objects to decrease the chances of success.
      6. The player who successfully takes the action (the player sending out the general), increases the diplomatic relations level with the target player by 1 (only with the target player). Update the diplomatic relations level on the diplomatic relations table with the corresponding numbered counter.
      7. If either the princess or jade seal object is used, and the action is successful, the increase the diplomatic relations level is 2.
      8. If the diplomatic relations level with any player (including non-human player) reaches 9, the player's Influence increases by 1.
    2. Search for Talent
      There are a number of generals that are undiscovered at the start of the game. During the game, there may also be leaders and generals defeated in battle added to this group of undiscovered generals. These may be discovered by using the Diplomatic Relations action (e.g. Lu Meng and Lu Xun etc.).
      1. There are no limits on how many diplomatic relations counters can be used on the same territory.
      2. Place a general counter with diplomatic relations counter on the territory (any of own territories) for which the player wishes to search for talent.
      3. The player may not pay gold or use object counters to improve the chances of success.
      4. If the search is successful (resolved during the resolution phase), place the discovered general's counter on the territory where the search was conducted (one of the areas of that territory).
    3. Recruit General
      This action attempts to recruit any free generals on the map or generals of other players (including non-human players). This is the only way to increase the number of generals under a player's command.
      1. There are no limits on how many diplomatic relations counters can be used on the same general.
      2. As with A2 above, if the Recruit action involves moving through or stopping at other players. territories (non-human players excluded), then the other player(s) may place the guards object to try and capture the general taking the action.
      3. If the general taking the action is not captured, and therefore safe, the general counter remains on the map. The action will be resolved during the resolution phase.
      4. The player may pay extra gold or objects to improve the chances of success. Other players may also pay gold or objects to decrease the chances of success.
      5. If the Recruit action is successful, place the general counter in the player's hand. If the recruited general was not a free general, i.e. recruited from another player, then the diplomatic relations level with that player is decreased by 1 (the decrease affects both players).
    8.5 Recruit Armies
    This is an important part of military preparations. Due to the high maintenance costs or lack or manpower, recruiting armies may be difficult. With proper planning and good use of the Recruit Armies action counter, excellent results may be achieved
    1. There are no limits on how many recruit armies counters can be used in the same round/season.
    2. Dice rolling is not required to determine the success of the recruit armies action. The action will definitely be successful (but a general is still required to take the action).
    3. For every recruit armies counter, up 3 infantry, 1 cavalry and 1 naval unit can be recruited during the resolution phase. The recruitment costs have to be paid immediate upon recruitment (1 gold per infantry unit, 2 gold per cavalry or naval unit). Players may collect special tax from their people with the Special Tax action counter as an alternative way of raising gold. This tax is on top of the usual spring season tax. As this is an unpopular move with the people, it will affect the player negatively should a disaster occur.

    8.6 Special Tax
    Players may collect special tax from their people with the Special Tax action counter as an alternative way of raising gold. This tax is on top of the usual spring season tax. As this is an unpopular move with the people, it will affect the player negatively should a disaster occur.

    1. There are no limits on how many special tax counters can be used in the same round/season.
    2. Dice rolling is not required to determine the success of the Special Tax action. The action will definitely be successful (but a general is still required to take the action).
    3. For every special taxes counter, roll 1 D6. The outcome is the amount of gold that is collected.
    4. For players who collected special taxes, if a disaster occurs in one of his territories during the following round/season, the player’s Influence is decreased by 1.
    8.7 Espionage
    The use of spies was common during the ancient times. Espionage is used in the game for obtaining information about other states and for stealing objects. Espionage tends to be complicated, involving many variables and procedures. The game has simplified espionage to the following:
    1. There are no limits on how many espionage counters can be used on the same territory in the same round/season.
    2. Place the espionage counter on the territory to be spied on (still requires placement of general counter).
    3. Only the territory’s owner’s guards may affect the chances of success.
    4. If the Espionage action is successful, the player may carry out one of the following:
      1. Steal one object (may check all objects of player before deciding).
      2. Steal one player card (may not check).
      3. Check all the armies of the other player (including type and quantity).
      4. Check total gold of the other player (stealing is not allowed).
      5. Check all the armies of the non-human player (see 14.0).
    5. If the Espionage action is unsuccessful, the player’s diplomatic relations with the other player is reduced by 1 (the decrease affects both players). The player’s Influence is reduced by 1.
    8.8 Guards
    Guards are mainly used for capturing enemy spies and generals carrying out Diplomatic Relations actions. Guards is an object counter, and may be saved up for later use when drawn. Once used, they have to be discarded
    1. When used on spies, guards can only affect the chances of success (during the resolution phase, add 2 to the outcome of the die throw).
    2. When used on generals carrying out Diplomatic Relations actions, a general is required to attempt the capture. The capture is resolved during the resolution phase via die throw (exception: when the general carrying out diplomatic relation action is passing through, the capture is resolved during the action phase, also via die throw).
    3. Guards may not be used if the general carrying out diplomatic relation action is coming to the player’s territory with the purpose of improving relations.
    The details for the calculation of success of actions can be found in 11.0.

    9.0 Battle Preparation Phase
    Players may invade any neighbouring territory. Generals and armies are needed for invasions. There are no limits on the number of generals and armies he may invade with. These need not be placed all at once on the map. Instead, he may place part of his forces, wait for the response of the other players before adding more of his own. This phase ends only after all players have completed their placements.

    Players may also pass through other players’ territories to support/reinforce one of the sides. The following picture helps to illustrate:

    C

    B1

    B2

    A


    Player A may, with Player B’s consent, pass through B2 to help defend against Player C’s invasion on B1. Player A will however need to pay 4x the supplies required. If instead, B1 belongs to a non-human player, or Player A needs to pass through 2 or more territories, the above route will not be allowed

    1. All generals and armies counters sent out during this phase are flipped over so that other players do not know their identities. Other players may also not spy or gather information on these general and army counters.
    2. When an area or territory is under attack (human or non-human players) and if a player has neighbouring territories to the territory under attack, he may send army reinforcements. Sending army reinforcements is similar to an invasion, except that the battle’s outcome does not affect the player sending reinforcements directly. The reinforcing player’s diplomatic relations with the reinforced player (human or non-human) is increased by 1 (see 13.0).
    3. Players may also send reinforcements in the form of gold (including players with neighbouring territories). However, this can only be done for reinforcing non-human players and the gold reinforcement is not refundable. When reinforcing other human players, only army reinforcements are allowed. Every 3 gold is equivalent to 1 infantry unit, and every 6 gold is equivalent to 2 cavalry or naval units. If the territory may not recruit naval units, then the gold reinforcements may not be used to exchange for naval units. For example, if You Zhou is under attack, the gold reinforcements will be used to exchange for level 1 cavalry units, in line with the territory card. [You may reinforce non-human players with both armies and gold, but can reinforce human players only with armies. – translator]
    4. When sending gold reinforcements, the reinforcing player’s diplomatic relations with the reinforced player is increased by 1. When sending both army and gold reinforcements, the diplomatic relations still increases by 1, and not 2.
    5. After placement of all general and army counters (including those of the defending side), reinforcements with armies or gold, the supplies transportation costs have to be calculated and paid. On every territory card, next to the outline of the territory, there are numbers such as X2 and X3. These numbers indicates the difficulty in keeping the armies supplied on the territory (the number on the left is the territory number. For example, 10.X2 means that invading territory number 10 incurs X2 the supplies transportation cost). The basic supplies transportation costs are shown in the table below. As an example, for 1 infantry unit invading a X2 territory, 1 gold is required and for 1 infantry unit invading a X3 territory, 2 gold is required (1.5 rounded up).

      Army Type

      Recruitment/
      Maintenance
      Cost

      Basic Battle Cost
      (Supplies Transportation)

      Infantry

      1

      0.5

      Cavalry

      2

      1

      Naval

      2

      1

      When attacking a different area of the same territory, the supplies transportation costs will always be based on X2
    6. When defending one’s own territory, supplies transportation costs is not required (reinforcements sent from other territories still require supplies transportation costs)
    7. When all generals and armies are placed on the map, the battles are ready to commence
    Example: Cao Cao invades area A (belonging to Liu Bei) and area B (belonging to non-human player Yang Feng). A number of generals and armies were sent to both areas (the types and quantities of which are unknown to other players because they are covered). Liu Bei sends out a number of generals and armies to defend, and also asks Sun Ce, whom shares a border with Liu Bei, for reinforcements. Sun Ce sends 2 infantry units as reinforcements for Liu Bei and also sends 6 gold to reinforce area B. The 6 gold is converted into 2 infantry units. At this moment, Cao Cao may send additional generals and armies to reinforce his own invading forces at area A or B. The reinforcing actions can continue until both sides end. When every player has completed their actions, the supplies transportation costs are calculated. If area A’s supplies transportation costs is based on X2, Cao Cao will need to pay 1 gold per infantry unit and 2 gold per cavalry or naval unit.

    In the above scenario, Liu Bei does not need to pay the supplies transportation costs. Sun Ce’s reinforcements to Liu Bei require supplies transportation costs and there may be a negotiation between Liu Bei and Sun Ce on who pays for that. In addition, when both battles end, Sun Ce’s diplomatic relations level with Yang Feng and Liu Bei are increased by 1 (Liu Bei’s diplomatic relations level with Sun Ce does not change).

    For other changes in diplomatic relations levels, see 13.0.

    There are areas that may not be reached directly (may not be invaded) unless certain restrictions are met. The details of these restrictions:

    1. The Lo Yang area may only be invaded after occupying either Han Gu Guan or Hu Lao Guan. When the armies exceeds the capacity of either pass/Guan (for example, Han Gu Guan’s capacity is 5 armies), the extra armies do not need to engage the enemy outside the city. These armies may be added to the defending force as it is depleted (subject to the same limit)
    2. The Xu Zhou territory, Xia Pi area may not invade Yang Zhou North territory, Wu Jun area. This is due to the major river between them
    10.0 Battle Phase
    The abilities of generals come to the fore during battles. Intelligence, military leadership and combat are all vital. Terrain also affects the effectiveness of each type of army unit. It is vital for players to use the corresponding army type on each terrain type

    10.1 Terrain
    There are three types of terrain, namely flatland, mountainous and river. On the map, the areas with mountains depicted are those with mountainous terrain, and the areas where the Yangtze River runs through are those with river terrain (the Yellow River does not count). The rest of the areas flatland terrain.
    There are some territories with areas of different terrain:

    1. Yang Zhou North territory: The Shou Chun area is of flatland terrain, while the rest are of river terrain.
    2. Yi Zhou Centre territory: The Cheng Du area is of flatland terrain, Jian Ge area is of mountainous terrain and the Ba Dong area is of river terrain
    Other than the above two territories, all other territories’ areas have the same type of terrain within each territory

    10.2 Terrain’s Impact on Army Types
    The following table describes the military strength of each army type on each terrain:

    Army Type

    River

    Flatland

    Mountainous

    City
    (attack/defence)

    Infantry

    1

    1

    2*3

    1/2

    (Level 2/1) Cavalry

    1

    2/3*

    1

    1/2

    (Level 2/1) Naval

    2/3*

    1

    1

    1/2


    River terrain refers to Yangtze River territories. Cavalry units’ military strength is reduced by 1 during summer (down to a minimum of 1). * indicates the terrains on which the army type enjoys advantages [I am not sure why Infantry has 2*3 listed under Mountainous. I suspect it is a typo and it should be 2*. – translator]

    Note: The orange horizontal line across the middle of the map indicates the border between north and south China. If the north invades the south during summer, the invader’s military strength is divided by 2.

    10.3 Battle
    During a battle, participating players may check one another’s generals and armies. Players name a commander and vanguard pick from their placed generals. When required, another general may be assigned as the advisor (this is not required when the commander’s intelligence is sufficiently high). When taking part in a battle outside the city, there is a chance that the vanguard general may be injured or killed. When defending a city/fortress and the defender loses, there is a chance that participating generals of the defender are captured. Players should take note of these possibilities. If there are insufficient generals to take on the above roles, then all abilities are fixed at 6 (intelligence, military leadership etc.).

    1. Invader’s First Decisions
    The invading player first decides whether to go ahead with the invasion, hold fast or retreat (holding fast postpones the invasion for one round/season while retreat ends the invasion). If retreat is chosen, then the battle ends immediately. This decision may be taken to attract the defender’s main forces, or to avoid unnecessary losses after finding out the defender’s superior military forces. Either way, the supplies transportation costs that were paid is not refundable. If hold fast is chosen, the defender may attack instead (the invader and defender then switch roles to become the defender and invader respectively) or may also hold fast. When both sides choose to hold fast, the battle gets carried over to the next round/season. During the next round/season’s battle preparation phase, both players have to calculate and pay military maintenance costs
    (see 5.0 point 3) and the generals involved in the battle may not take other actions
    2. Defender’s Decisions
    The defending player decides to defend by engaging the invader outside the city or to defend the city/fortress (when the invader switches role to become the defender, he may only take part in the battle outside the city. When the defender has more army units than the city/fortress’ capacity, he must send out the excess army units to engage the invader outside the city). Once the defend the city/fortress option is chosen, the defender may not subsequently choose to retreat (when excess army units are engaging the invader outside the city and the defender loses, the defeated generals may retreat to other territories without bothering with the army units still in the city/fortress)
    3. Invader’s Second Decisions
    If the defending player decides to defend the city/fortress, the invader is faced with a second decision, to attack the city/fortress or to surround the city/fortress. If the invader chooses to surround the city/fortress, the defender has to carry out a test for sufficient morale (see 10.3 point 8), after which the situation is the same as that when both sides decide to stand fast, i.e. the battle gets carried over to the next round/season and both players have to calculate and pay military maintenance costs
    4. Use of Stratagem Cards
    The commander (or advisor) with the lower intelligence decides whether to use strategem cards (if intelligence is the same for both sides, then the invader goes first). To use strategem cards, throw 2 D6. If the outcome is equal to or less than the commander’s intelligence, then the strategem card is played. To determine if the played strategem card is successful, the other player now throws 2 D6. If the outcome is larger than the intelligence (of the higher of own commander or own advisor), the strategem card is successful. The implications of successful strategem cards are written on the card (e.g. X2 or X3 military strength). The commander (or advisor) with the higher intelligence now decides whether to use strategem cards. The procedure is the same as that just described. The table below explains each strategem card and its implications:

    Strategy

    Who/What It Affects

    Test for Success

    Implications

    Note

    1. Fire trap

    Opposing forces, attacking city or loss of gold
    Both sides’ intelligence
    (If gold, then target +2)
    Military strength X2
    (Attacking city X1.5)
    Zhou Yu, Lu Xun and Zhuge Liang
    – 1
    2. Water trap
    Opposing forces or attacking city
    Both sides’ intelligence
    Military strength X3
    (Attacking city X2)
    Influence – 1
    3. Ambush

    Opposing forces

    Both sides’ intelligence
    Military strength X2
    Zhuge Liang
    – 1
    4. Raid

    Opposing forces or loss of gold

    Both sides’ intelligence
    (If gold, then target +2)
    Military strength X2
    Cao Cao, Zhang He less 1
    5. Fake army

    Own forces

    Both sides’ intelligence
    Successful retreat
    Opponent is Cao Cao, Sima Yi – 1
    6. Boost morale

    Own forces (including defending city)

    Own commander’s eloquence
    Military leadership reduced by 3, towards recovery
    1 of every 2 armies recover, the remaining army is lost
    7. Follow
    through trap

    Strategies 3, 4, 10, 11 and 13

    Both sides’ intelligence
    (own not lower than opponent’s)
    Strategy X2
    Enemy retreats
    8. Empty city
    Trap

    Opposing forces

    Both sides’ intelligence
    Retreat or military strength X2
    (Enemy retreats) against opponent with intelligence 8 or above – 1
    9. Backs against the wall

    Own forces

    Own intelligence and military leadership
    Recover, military strength X2
    Military leadership need not – 3, but military strength divide by 2 if unable to play strategem card
    10. Feint attack
    Opposing forces or attacking city
    Both sides’ intelligence
    Military strength X1.5

    11. Lure enemy away from strong point
    Opposing forces or attacking city
    Both sides’ intelligence
    Military strength X1.5, defenders engages invaders outside city

    12. Anger and lure enemy out

    Opposing forces

    Both sides’ intelligence
    Military strength X1.5
    Enemy vanguard intelligence 5 or below – 1
    13. Lure enemy into trap

    Opposing forces

    Both sides’ intelligence
    Military strength X2

    If “boost morale” or “backs against the wall” strategems are successful, player may first take the “replenish armies” procedure described under point 11 below. “Follow through trap” may only be used if the opponent was unable to play his strategem card (it may not be used if the opponent able to play his strategem card, but the strategem was unsuccessful)
    5. Calculation of Total Military Strength Example
    Sum up the military strength of both participants of the battle (military strength is 0 for a player with no armies). When the strategem card was played and successful, multiply the military strength total by the effect of the strategem (e.g. 1.5 or 2 depending on strategem). Following that, calculate and add the difference in combat of each player’s vanguard general (for example, A’s vanguard of 8 and B’s vanguard of 6 will mean an addition of 2 to A’s military strength and no change for B). For the defender, when defending the city, add the city/fortress’ defensive value. Finally, determine the invader to defender military strength ratio, rounding down if necessary. For example, 21:11 rounds down to 2:1.

    6. Dice Throw Adjustments
    Determine the column corresponding to the calculated invader to defender ratio from the Battle Outcome Table. The invader rolls 2 dice, and adds the total to the differential between both players’ commander’s military leadership (for example, the invader’s and defender’s commanders’ military leadership are 7 and 6 respectively, the differential will be +1. If the invader’s commander’s military leadership is lower than the defender’s, then the differential will be negative). The final total is used to determine the battle outcome.
    7. Battle Outcome
    Read off the battle outcome based the adjusted dice throw (corresponding row) and calculated invader to defender military strength ratio (corresponding column). The number on the left indicates the number of armies defeated for the invader, and the number on the right indicates the number of armies defeated for the defender. Each player chooses which army units are defeated and turn them over to indicate their loss. If the dice throw (before adjustments) is 2 or 3, the invader’s vanguard general needs to go through a combat test. If the dice throw (before adjustments) is 11 or 12, the defender’s vanguard general needs to go through a combat test. Finally, if the dice throw (before adjustments) is 12, the defending city’s defensive value is reduced by 1. The vanguard’s test for combat involves throwing 2 dice. If the outcome is greater than the vanguard’s combat, the vanguard general suffers an injury. Throw 1 die to determine the number of rounds required for full recovery. If the test for combat throw results in 12, the vanguard dies in battle. If the test for combat throw result is equal to or less than the vanguard’s combat, there is no impact. The vanguard will not be able to take part in the current battle if injured or dead, and the general is removed from the battle.
    8. Morale Test
    If an * appears next to the left number on the Battle Outcome Table, the invader needs to go through a morale test to determine the additional army units lost (see the Morale Test Table). If an * appears next to the right number on the Battle Outcome Table, the defender needs to go through a morale test.
    9. Retreat
    At this point in time, both sides decide whether to retreat, starting with the defender, followed by the invader. If neither player retreats, then repeat the steps from 2 onwards, until one side retreats (defender defending city/fortress may not retreat). If both sides lose all armies, then the invader retreats and the defender is the winner of the battle. However, the defender does not earn the increase in Influence (the invader still loses Influence).
    10. Pursuit
    If pursuing, the pursuing player calculates the military strength of the advantageous army type and adds to that half the military strength of the rest of the armies (rounded down). This total is compared to the military strength of the retreating player (military strength of the advantageous army type and add to that 1/3 the military strength for the rest of the armies). The consideration of vanguard’s combat and dice throw adjustments still apply. The pursuing player rolls the 2 dice to determine the battle outcome, after which the battle ends (pursuing player is unaffected by the battle outcome. However, if the retreating player use the ambush strategem successfully, then the pursuing player is affected by the battle outcome).
    11. Army Recoveries
    The winning player (including the pursuing player) may recover half of his defeated armies. This is done by flipping back half the defeated armies (done by army type, e.g. for every 2 same level cavalry units, 1 is recovered). The losing player does the same for his defeated armies. However, the losing player needs to conduct a recovery test with the general with the highest eloquence who took part in the battle. For example, if the general has eloquence of 8, the losing player throws 2 D6. If the outcome is 2 to 8, then the army is recovered successfully. Every to-be-recovered army unit has to go through this recovery test before they can be recovered
    12. Losing Player’s Generals in City/Fortress
    Generals in a city/fortress may not retreat. Every such general needs to go through a combat test. Throw 2 D6. If the outcome is greater than the combat of the general, the general is captured. If the outcome is equal to or less than the combat of the general, the general escapes. Captured generals with loyalty of X dies (captured leader may be imprisoned). For captured generals with a numerical loyalty, the winning player may recruit, imprison or execute. If recruit is chosen, follow the procedure listed under 11 point 5. Other players may not pay gold to interfere with this process. If the recruitment fails, then the general becomes a free general, not employed by any leader
    13. Calculation of Diplomatic Relations Level and Influence
    After the battle ends, participants calculate and make the adjustments to their diplomatic relations level and Influence
    14. Occupied Areas
    If the winning player occupies an area of the losing player, that area’s land value is increased by 1 (if the invader to defender ratio was 5:1 at the start of the battle, the invader wins automatically and the land value need not increase. The same applies when the ratio is 1:5). Place the flag of the winning player on the occupied area

    If the winning player occupies an area that splits the losing player’s territories into two disconnected parts, the losing player has to split his generals, gold, armies etc. between the two parts. Calculations of income and outgo will be done separately for the two parts, until they can be re-joined in future rounds/seasons. The losing player may assign nothing to one of the parts, leaving it open to other leaders to occupy

    11.0 Resolution Phase
    The success and failure of actions are decided only during the resolution phase (exception: use of guards). Players may carry out their own tests for success, without limitations on player order. If there were changes to a general’s assignment of duties after the action phase, then the original action or duty is voided (for example, if a general was assigned to improving the defence of a city during the action phase, and was subsequently called on to take part in a battle, then the original action of improving the defence is voided. The player may not assign another general to take over that task)

    Actions Table
    This table clearly each action’s probability of success and what it affects. Other than the Recruit Armies and Special Tax actions, all other actions require an intelligence test (2 D6). Note that regardless of the general’s intelligence and number of additional gold or objects used (1 gold reduces the throw outcome by 1, object also reduces the throw outcome by the object’s value), as long as 11 or 12 is thrown (excluding any adjustments to the throw outcome), the action is considered to have failed. Players may not use gold or objects to affect the success of the action after the dice throw


    Action

    Dice Throw Test

    Adjustments Via

    Effect of Success

    Limit

    1
    Land

    Intelligence
    (Basic payment of gold required)

    Gold
    Land Value –1
    Once per territory**
    2
    Prevent Flood
    Intelligence
    Gold
    Flood Prevention Value +1
    Once per territory
    3
    Defence
    Intelligence less Defensive Value
    Gold
    Defensive Value +1
    Once per territory
    4
    Diplomatic Relations
    Diplomatic Relations Level
    (Eloquence)
    Gold or Object
    Diplomatic Relations Level +1/+2
    -

    Search for Talent
    Intelligence
    -
    Free general appears on map
    -

    Recruit General
    Eloquence less Loyalty less Charisma *
    Gold or Object
    General employed by self
    -
    5
    Recruit Armies
    -
    -
    3 infantry units, 1 cavalry unit and 1 naval unit
    -
    6
    Special Tax
    -
    -
    Gold equal to 1 D6
    -
    7
    Espionage
    Intelligence
    -
    (See 8.7) -
    8
    Guards
    Intelligence
    -
    Capture general taking Espionage action/Espionage action fails
    -
    * Where the general is employed by another leader
    ** Exception being Tun Tian System
    (see 6.2)

    1. Land, prevent flood and Espionage actions requires only the intelligence test. Throw 2 D6. If the outcome is equal or less than the action taking general’s intelligence, then the action has succeeded. If the guards appear during an Espionage action, each guards object adds 2 to the throw outcome. Each gold spent by the player taking the action reduces the throw outcome by 1.

      Example 1: A general (intelligence 8) is taking the Espionage action. 2 guard object counters are placed by the opposing player. The player taking the Espionage action can only succeed by throwing 2 to 4

      Example 2: A general (intelligence 7) is taking the Prevent Flood action. The player also pays 3 gold to improve the chances of success. He/she succeeds by throwing 2 to 10

    2. Special tax and Recruit Armies actions do not require intelligence tests. They will definitely succeed. There are however limits on the types of armies that can be recruited in each territory. The details are as follows:
      Infantry: All territories
      Level 1 cavalry: Only on territories with the cavalry unit icon
      Level 2 cavalry: All territories
      Level 1 naval: Only on territories with the naval unit icon
      Level 2 naval: Territories number 3, 4, 5 and 7 (Qing Zhou, Xu Zhou, Ke Zhou and You Zhou)
    3. Defence and Land actions’ intelligence tests are similar. For defence, the defensive value of the area needs to be subtracted from the dice throw outcome

      Example: A general (intelligence 7) is taking the Defence action for a particular area (defensive value 3). The player taking the Defence action can only succeed by throwing 2 to 4. If the player also pays 5 gold during the action phase (or just before the dice throw), he succeeds by throwing 2 to 9

    4. The intelligence test for the Guards action is the same as that for the Land action. However, upon success with the intelligence test, the targeted general also goes through an intelligence test. If the outcome of this throw is equal to or less than the general’s intelligence, the general escapes. If the outcome is larger than the general’s intelligence, the general is captured

      Example: A general (intelligence 8) uses guards to capture an opponent’s general (intelligence 7) taking the Recruit General action. The general using guards first rolls 2 D6. Suppose 7 is rolled and the capture is successful. The opposing general taking the Recruit General action now rolls. Suppose 7 is also rolled. The opposing general therefore escapes and can take the Recruit General action (if the opposing general was passing through the territory, then the Guards action is resolved during the action phase)

    5. When a general is taking the Search for Talent action, an intelligence test is required. If the search yields an undiscovered general but the year of discovery shown on the general counter is later than the current year, then the Search action fails. When taking the Diplomatic Relations action, check the leader’s diplomatic relations level with the target leader. Gold, objects and eloquence affects the chances of success

      Example: Liu Zhang sends a general (eloquence 8) to take the Diplomatic Relations action with Liu Biao (on Liu Zhang’s information table, the diplomatic relations level with Liu Biao is 5). The general brings 1 gold and 1 treasured sword (value of 2) with him. Summing up the values, we obtain 5+1+2=8. The adjustment to the dice throw due to the general is added (eloquence 8 less Liu Biao’s intelligence 6 = 2) to arrive at 10. In other words, a throw of 2-10 is a success. If successful, Liu Zhang’s diplomatic relations level with Liu Biao is increased to 6 (if using the jade seal or princess, the increase will be to level 7). The adjustment (eloquence less intelligence) is also added if it turns out to be negative. The above situation, requiring the dice throw, is for the case when Liu Biao is a non-human player. If Liu Biao is a human player, then both players negotiate terms, and if Liu Biao agrees, the action is successful. If Liu Biao refuses, then the action is a failure. The action still requires the use of the diplomatic relations counter. Another way of improving diplomatic relations level, is via affecting the diplomatic relations levels between other players (also usable on non-human players).

      Example: Player A sends a general to player B’s territory to improve the diplomatic relations level with B. At the same time, A also plans to affect the relations between players B and C (worsen their relationship). Player A first checks from his leader information table the diplomatic relations level with B and that of C (C has to be a human player) with B. The chances of success is equal to the former number reduced by the latter number. Player A may also use gold or objects and the general’s eloquence to affect the chances of success. If the action is successful, A’s diplomatic relation with B is increased by 1 and C’s diplomatic relation with B is decreased by 1.

      When taking the Recruit General action, the chances of success is equal to the eloquence of the general taking the action less the loyalty of the target general. If the outcome of 2 D6 is equal or smaller than the above, then the action is successful (if the target general is employed by a leader, then add on the leader’s charisma). If the outcome is larger than the above, the action is a failure. Besides the player taking the Recruit General action, other players may also use gold or objects to increase or reduce the chances of success.

      Example: A general (eloquence 8) is taking the Recruit General action on a general employed by a leader (loyalty of general 8 and charisma of leader 6). Combining, this gives -6. The general uses 8 gold and 1 beautiful woman (value of 4) to increase the required throw from -6 to 6. Other players may use gold or objects to affect the throw. If no players do so, then the recruiting player requires a throw of 2 to 6 to succeed. If successful, the target general becomes the recruiting player’s general, and the diplomatic relations level with the original employing leader is reduced by 1 (both players reduce by 1)

      When all actions are resolved (success or failure), the current phase ends and we move on to the next phase

    12.0 Completion Phase
    The main purpose of this phase is to limit the number of player cards held and to return certain counters. The steps are as follows:

    1. Check for each player if the number of player cards (strategem cards) has exceeded 4. Discard the excess down to 4
    2. Return all used gold, object counters and action counters (if the jade seal and chitoo horse were used during Diplomatic Relations actions, leave them on the territories they were used on). Action counters can never be retained for use in the next round/season
    3. If the current round/season is winter, remove all non-human players’ armies from their respective territories
    4. Check each player’s Influence to see if the winning condition has been met (see 14.0). If a player meets the winning condition, the game ends
    5. Move the season counter to the next season and year counter to the next year, if required. Repeat A to H phases (see 4.0). If the current year is 220 AD and current season is winter, then the season counter does not move. The game ends and the player with the highest Influence wins
    13.0 Diplomatic Relations
    Improving diplomatic relations with one another is an important aspect of this game. Although the main purpose of improving diplomatic relations with one another is to gain Influence, there are other good reasons for doing so:
    1. Trading of armies
    2. Trading with a player is forbidden if your diplomatic relations level with that player falls to 1 or 0.
    3. If your diplomatic relations level with a non-human player is 8, you may borrow gold from the non-human player. The amount is the outcome of 1 D6. The amount borrowed has to be returned the following spring.
    4. If your diplomatic relations level with a non-human player is 9, you may borrow gold or armies from the non-human player. With gold, the procedure is as described above. The number of armies that can be borrowed is the outcome of 1 D6 (infantry only). The armies borrowed have to be returned the following spring (the military maintenance costs for spring has to be paid). The supplies transportation costs when borrowing and returning also has to be paid and is equal to the basic supplies transportation costs (X1).
    The table below lists each player’s starting diplomatic relations level with one another as well as that with non-human players, and the ways to increase or decrease them:

    Leader

    Yuan Shao

    Cao Cao

    Liu Bei

    Sun Ce

    Liu Biao

    Liu Zhang

    Yuan Shao

    -

    4

    5

    5

    6

    5

    Cao Cao

    4

    -

    5

    6

    5

    5

    Liu Bei

    5

    5

    -

    5

    5

    5

    Sun Ce

    5

    5

    5

    -

    4

    5

    Liu Biao

    6

    5

    5

    4

    -

    5

    Liu Zhang

    5

    5

    5

    5

    5

    -

    Lu Bu

    5

    3

    5

    5

    5

    5

    Yang Feng

    5

    5

    5

    5

    5

    5

    Yuan Shu

    7

    4

    4

    6

    5

    5

    Zhang Xiu

    6

    4

    5

    5

    7

    5

    Ma Teng

    5

    5

    5

    5

    5

    5

    Gongsun Zan

    3

    5

    7

    5

    5

    5

    Increase/Decrease Diplomatic Relations Levels:
    +1
    Send reinforcements to battles involving other players
    +1
    Successfully taking the Diplomatic Relations action (+2 if jade seal or princess is used)
    +1/-1
    Successfully taking the Diplomatic Relations action to affect the diplomatic relations levels between other players (see 11.0 point 5).
    -1
    Player who attempts and fails the Espionage action
    -2
    Player who borrowed gold or armies and is unable to return them the following spring

    Both players

    -1

    Conflicts (including battles, recruitment of employed generals, not accepting exiled leaders, exiled leaders do not return borrowed land, etc.)

    14.0 Influence
    Influence is the only way to win the game. At the start of the game, each player’s starting Influence is different. This is to reflect each leader’s different background, strength and reputation. However, after the start of the game, these differences can change drastically, depending on the skill of players. The starting Influence of each leader is as follows:
    Yuan Shao

    13

    Cao Cao

    12

    Liu Bei, Liu Biao, Liu Zhang

    11

    Sun Ce

    10


    The list below covers all the ways that Influence can increase or decrease. Once the conditions required are fulfilled, the Influence increases/decreases immediately. However, even if the victory condition is satisfied, the round/season has to end before the player is declared the winner

    Category

    Condition

    Change in Influence

    Diplomatic Relations

    Diplomatic relations level with another leader reaches 9
    +1 (-1 if the diplomatic relations level drop back below 9)
    Failure to return loan of gold or armies
    -1

    Domestic Development

    Complete land development for territory
    +1 (-1 if the land value increases back above 0)
    Economic collapse
    -2

    Political

    Attack Cao Cao (Secret Blood Decree from the Han Emperor event)
    -2 (One time only, and if Cao Cao attacks first, player will not attract -2 Influence for future attacks on Cao Cao)
    Espionage action fails.
    -1
    Release of all captured generals after battle
    +1

    Military

    Winning battles (outside city or city/fortress)
    +1
    Occupy Xu Chang
    +3
    Occupy area
    +1
    Losing battles (outside city or city/fortress)
    -1
    Loss of Xu Chang
    -3
    Loss of area
    -1
    Use water trap strategem
    -1
    Losing 10 or more armies after battle ends
    -1
    Attacking other leaders with which diplomatic relations level is 9
    -2

    Others

    Leader dies
    -2
    Leader exiled
    -2
    Accepting leader in exile
    +1
    Not accepting leader in exile
    -1
    Leader in exile not returning borrowed land
    -1

    The amount of Influence required to win the game depends on the number of human players:
    3 players: 40 Influence
    4 players: 35 Influence
    5 players: 30 Influence
    6 or more players: 25 Influence

    15.0 Human and Non-human Players
    Certain leaders have special events pertaining to them, e.g. Liu Bei, Liu Biao. These are written on the respective leader information tables.

    Leaders not controlled by humans are non-human players. These do not have gold nor armies, and do not have to meet any military maintenance costs. When human players invade non-human players’ territories (one of its areas), a certain number of armies will appear on each area of that territory to act as defence. The invader throws 2 D6 to determine the number of armies to be placed on each area (1 throw per area).

    1. The only way to know non-human player’s army size in advance is via the use of the Espionage action counter. If the Espionage action is successful, throw 2 D6 to determine the number of armies to place on the corresponding area on the map (player does not need to attack the area to take the Espionage action)
    2. At the end of every winter, all non-human player’s armies are removed from the board. Human players need to take the Espionage action again to find out the number of armies
    3. When the following years are reached, the non-human players number of armies will increase as follows:
      200 AD: +1 army
      204 AD: +2 armies
      208 AD: +3 armies
      212 AD: +4 armies
      216 AD: +5 armies
      220 AD: +6 armies
      Note that the above are added to the outcome of the 2 D6 throw. For example, to determine Zhang Lu’s armies in 208 AD, a throw of 8 means 11 armies (8 + 3)
    4. There are leaders with loyalty marked X. If these leaders are defeated in battle and escape (no territories to retreat to), their general counters are moved to the free generals pile. If a human player discovers one of these leaders when taking the Search for Talent action, draw bad-luck counters to determine where they appear. The chosen number will be where the non-human player is placed (draw until non-human player’s territory’s card is drawn). If this territory is invaded in the future, throw 2 D6 to determine this leader’s armies (there will therefore be the territory’s armies and this leader’s armies on that territory). If this leader is defeated and escapes again, this leader does not retreat. His general counter is moved to the free generals pile and may be drawn again by human players taking the Search for Talent action
    5. For generals with loyalty marked X, if they escape after defeat in battle, carry out the same steps as above. However, they will become recruited by non-human leaders occupying that territory. If there are no non-human player territories for points 4 and 5, then the general counters are removed from the game when drawn
    6. For certain territories without general counters, its general’s abilities are all set as 6 (intelligence, military leadership etc.)
    Some special circumstances apply to certain non-human players, with the exception of Yuan Shu and Lu Bu (see 3.0). When Ma Chao, Han Sui or Pang De is recruited by the non-human players, Liang Zhou’s will not suffer from any foreign invasion or incursions (the territory’s foreign invasion or incursions icon is considered void)

    16.0 Exile
    A leader who chooses to go into exile, or is forced into exile (no territories), will have his influence decreased by 2. The process after going into exile is as follows:

    If the human player has an agreement with another player, the player in exile may choose that particular player to join. If there are several players willing to accept the player, or no players are willing to accept, then the exiled player chooses the player with whom the diplomatic relations levels is the highest (if there are several with the same level, then the exiled player chooses from those leaders with the same diplomatic relations level) to join. If the chosen leader rejects the exiled player, his Influence is reduced by 1 and both players’ diplomatic relations level with each other is reduced by 1. The exiled leader then moves on to the next player, and continues this process. If there are still no players willing to accept the exiled leader, the exiled leader may join the non-human player with whom the diplomatic relations level is the highest (if there are no non-human players, then the game ends for the exiled leader). The leader who accepts the exiled leader gains 1 Influence

    Exiled leaders who join other leaders may temporarily occupy an area (the leader accepting the exiled leader chooses the area while for non-human players, the area with the lowest income is chosen) and may receive income from that area. The player accepting the exiled leader may request return of the area at any time (if the exiled leader refuses, he loses 1 Influence). The exiled leader then begins the process as described above of joining a leader again. Exiled leaders may also rebel on the borrowed area and it will be treated as a battle. The exiled leader may also refuse to return the area (reduce 1 Influence and both leaders’ both players’ diplomatic relations level with each other is reduced by 1)

    17.0 Choosing Leaders
    If there are fewer than 6 human players, the following leaders are suggested:
    3 players – Play as Cao Cao, Sun Ce and Liu Biao
    4 players – Add Yuan Shao
    5 players – Add Liu Bei
    6 players – Add Liu Zhang

    Players may feel that the above is not the best combination with three players, since Yuan Shao is not in the game to provide resistance to Cao Cao. However, this combination is probably more suitable from the perspective of balance, as all three leaders share borders with one another and also have space to grow. Players may of course discuss and come up with their own combinations. The above suggestion is only a guide

    18.0 Additional Counters
    When playing with 7, the additional player takes the role of Ma Teng (only when there are 7 human players). At the start of the game, Ma Teng occupies territories 10 and 11, with 10 gold, the generals of Ma Chao, Han Sui and Pang De, 4 infantry units and 2 cavalry units (level 1) and Influence 10.

    1. Ma Teng does not have a leader information table and does not have any diplomatic relations level.
    2. Ma Teng does not need to pay military maintenance costs every spring (supplies transportation costs still need to be calculated and paid). This is until Ma Teng occupies another territory.
    3. To make up for Ma Teng’s lack of Diplomatic Relations actions, Ma Teng may trade Influence with other players during the trading phase as part of his winning condition (example: exchanging 1 level 1 cavalry unit for 1 Influence).

    19.0 Basic Strategies for Each Leader
    Each player has a chance to win, depending on the tactics employed. For example, diplomatic relations between players, invasion plans and routes, use of strategems. The various leaders starting positions and their basic strategies are discussed below:

    Yuan Shao – At the start of the game, Yuan Shao occupies the 3 Zhous of Yi, Qing (half) and Bing. His economic strength is the highest amongst all players and is Cao Cao’s biggest rival. Due to the need to defend his vast territories and shortage of manpower, the starting strategy would be to search for talent and recruit more generals. Besides that, Yuan Shao also needs to keep tabs on Cao Cao’s movement, and to occupy You Zhou if the opportunity arises (example, Cao Cao is busy invading Si Li). When Yuan Shao’s power base stabilizes, it will be time to invade Cao Cao. When doing so, pick a time when Cao Cao is busy with other battles, because Yuan Shao’s generals’ abilities are on average lower than that of Cao Cao’s generals’. To have a good chance of winning, attack on a few fronts, while hiding the main force. It is also important to try abd convince other players to attack Cao Cao from a different front at the same time.

    Cao Cao – Second to Yuan Shao in economic strength. Due to his large number of generals with strong abilities, Yuan Shao’s invasion does not pose too great a threat. Cao Cao also enjoys a political advantage (-2 Influence when attacking Cao Cao). These should ensure Cao Cao is not defeated easily. Do not be overly hasty when invading new territories and not to do so with a high proportion of his armies (Cao Cao’s is in the middle of all players’ territories, and doing so will invite invasions from other fronts). Once Cao Cao’s power base stabilizes, it will be time to invade Yuan Shao. Besides that, Liu Bei’s territory should not be taken early. Instead, Liu Bei can be another player to help Cao Cao resist Yuan Shao’s forces. Although Liu Bei is weaker, his impact should not be ignored.

    Sun Ce – Not a weak leader with many generals with well-rounded abilities. Although Sun Ce’s starting economic strength is not high, with careful planning and development, Sun Ce can become Cao Cao’s nemesis. It is unfortunate though that there is a chance that Sun Ce will pass away early. Besides that, recruit cavalry units only after building up a substantial naval force, in preparation for attacking the north.

    Liu Biao – Not a weak leader, with stronger economic strength than Sun Ce. If there are no human players to his west, then these territories will be a good way to increase his power base. At the start of the game, do not try to extend northwards as it is difficult to defend against the northern forces. Liu Biao lacks an advisor-like general and can consider recruiting Jia Xu (though this will affect diplomatic relations with Zhang Xiu). Once he is recruited, taking any action will become easier. As with Sun Ce, recruit cavalry units only after building up a substantial naval force, and the proportion of cavalry units should not be too high.

    Liu Zhang – Occupies a territory that is in a corner of the map. With intelligent advisors such Fa Zheng and strong generals such as Zhang Ren, it should not be difficult for Liu Zhang to expand his territories. However, his neighbouring territories are of poorer quality, making it difficult to increase his forces substantially. Liu Zhang should try to expand southwards or Han Zhong. When the powers to his east start to attack each other, he can consider expanding into Liang Zhou, or attack Liu Biao to his east. Due to the different terrains in his territories, naval and cavalry units are both important. The proportion of cavalry units will depend on the player’s preference to expand northwards or eastwards.

    Liu Bei – A legendary leader in history, but occupies only one territory in the game. He is also surrounded by stronger rivals and lacks an intelligent advisor. Invading other territories will be challenging. Playing Liu Bei requires skill. Liu Bei plays a balancing role in the battle between the two great northern powers. If Yuan Shao and Cao Cao understands the importance of Liu Bei (Liu Bei needs to impress this upon the other two players), then the chances of defeat will be much reduced. Besides that, diplomatic relations with other players is also very important. If successful, Liu Bei may be able to expand with their aid. If Yuan Shao and Cao Cao engages each other in a major battle, Liu Bei can take the opportunity to capture other territories and increase economic strength. To maintain balance in the game, Zhao Yun and Zhuge Liang can only be employed by Liu Bei. However, these two generals appear later in the game and Liu Bei will need to recruit other generals while waiting for Zhuge Liang’s aid.

    The above points are for reference only. Players may adopt different strategies during the game, adapting as circumstances arise to rise above all other rivals and win. This is the ultimate goal behind this game – putting your wit to good use. We hope players enjoy the game

    Non-Human Player Armies

    Dice Throw

    Territory

    2

    3

    4

    5

    6

    7

    8

    9

    10

    11

    12

    1 Yang Feng

    6

    6

    6

    6

    7

    7

    7

    8

    8

    9

    9

    2 Li Jue

    7

    7

    7

    8

    8

    8

    9

    9

    10

    10

    11

    (Pei Cheng ) 3 Lu Bu

    6

    6

    7

    7

    7

    7

    8

    8

    8

    9

    9

    (Bei Hai) 7 Kong Rong

    5

    6

    6

    6

    7

    7

    7

    7

    8

    8

    9

    8 Gongsun Zan1

    8

    9

    9

    9

    10

    10

    10

    11

    11

    12

    12

    10, 11 Ma Teng1

    9

    10

    10

    10

    11

    11

    11

    12

    12

    12

    13

    12 Zhang Lu2

    6

    6

    7

    7

    7

    8

    8

    8

    9

    9

    10

    14 2

    5

    6

    6

    6

    7

    7

    7

    7

    7

    8

    8

    15 Zhang Xiu

    7

    7

    7

    7

    8

    8

    8

    8

    9

    9

    9

    (Shou Chun) Yuan Shu

    6

    6

    6

    6

    7

    7

    7

    7

    8

    8

    8

    20

    5

    6

    6

    6

    7

    7

    7

    7

    7

    8

    8

    Liu Bei

    8

    9

    9

    9

    10

    10

    10

    11

    11

    12

    12

    Liu Zhang3

    9

    10

    10

    11

    11

    11

    12

    12

    12

    13

    13

    Yuan Shao

    12

    12

    13

    13

    14

    14

    14

    15

    15

    16

    16

    1. All infantry units
    2. All cavalry units are level 1 cavalry units
    3. 1 naval unit for every 5 army units

    Battle Outcome Table

    DR

    1:4

    1:3

    1:2

    1:1.5

    1:1

    1.5:1

    2:1

    3:1

    4:1

    Ratio

    Dice Throw

    2

    ***5/1

    ***4/1

    **4/1

    **3/1

    *2/1

    *2/1

    3/2

    3/2

    2/2

    2 Invader vanguard

    3

    ***4/1

    **4/1

    **3/1

    *3/1

    *2/1

    3/2

    3/2

    2/2

    2/2

    3 combat test

    4

    **4/1

    **3/1

    *3/1

    *2/1

    3/2

    3/2

    2/2

    2/2

    2/2

    4

    5

    **3/1

    *3/1

    *2/1

    2/1

    3/2

    2/2

    2/2

    2/2

    2/3

    5

    6

    *3/1

    *2/1

    2/1

    3/2

    2/2

    2/2

    2/2

    2/3

    2/3

    6

    7

    *2/1

    2/1

    3/2

    3/2

    2/2

    2/2

    2/3

    2/3

    2/3

    7

    8

    2/1

    3/2

    3/2

    2/2

    2/2

    2/3

    2/3

    2/3

    1/3*

    8

    9

    3/2

    3/2

    2/2

    2/2

    2/3

    2/3

    2/3

    1/3*

    1/3*

    9

    10

    3/2

    2/2

    2/2

    2/2

    2/3

    2/3

    1/3*

    1/3*

    1/4**

    10

    11

    2/2

    2/2

    2/2

    2/3

    2/3

    1/3*

    1/3*

    1/4**

    1/4**

    11 Defender vanguard

    12

    2/2

    2/2

    2/3

    2/3

    2/3*

    1/3*

    1/4*

    1/4**

    1/5***

    12 combat test
    Defensive value -1
    1. If the target is the golden number, battle outcome X3 and represents the number of losses.
    2. 5:1 is an automatic victory, land value is not affected.
    3. Losses are cumulative.
    4. When defending a city/fortress, test for loss * level, +1 level per round/season.

    [I have no idea what the above two footnotes mean. I have therefore translated them literally. – translator]

    Morale Test Table

    Military Leadership
    Dice Throw

    6

    7

    8

    9

    10

    2

    1

    1

    0

    0

    0

    3

    2

    1

    0

    0

    0

    4

    2

    1

    1

    0

    0

    5

    3

    2

    1

    0

    0

    6

    3

    2

    1

    1

    0

    7

    3

    2

    2

    1

    0

    8

    4

    3

    2

    1

    0

    9

    4

    3

    2

    2

    0

    10

    4

    4

    3

    2

    1

    11

    5

    4

    3

    2

    1

    12

    5

    4

    3

    3

    2

    ** Military leadership – 2
    *** Military leadership – 3

    [I have no idea what the above two notes mean. – translator]

    Roll once for every 5 units (split up the army types; extra units still require a roll but a reduction to throw outcome is applied. For example, if there are 4 army units left over, reduce the throw outcome by 1, and if there is 1 army unit left over, reduce the throw outcome by 4, and so on). The result from the throws are the additional defeated armies


    Errata and Counters Explanation
    Map
    1) Territories 14, 17 and 19 share borders with territory 20.

    2) In the first column of the morale test table, 6 implies 1-6 military leadership.

    Counters
    3) Tian Feng is a green colour general counter, and starts the game as a general under Yuan Shao.

    4) Use 2 naval army counters (without numbers) as the year and season counters.

    5) Huang Zhong's general number is 21.

    6) There is an extra None and Draw 2 bad-luck counter. The total number of bad-luck counters players should use is 32.

    7) Ma Chao's loyalty is "X"; i.e. he cannot be recruited.

    Cards
    8) The event icon of the middle area of territory 16, Jing Zhou Middle Section, should be level 1 naval unit and not flood.

    9) Xu Du, as mentioned on the Xun Yu, Xun You event card, is Xu Chang on the map.

    Counters Explanation
    10) The general assigned as the commander cannot be assigned as the vanguard at the same time.

    11) For both participants in a battle, when playing strategem cards, the intelligence test can be carried out by the general with the highest intelligence (e.g. advisor). During the army recoveries, the loser may pick the general with the highest eloquence to take the action.

    12) When carrying out strategies that targets the gold of the other player, the player playing the card adds 2 to the outcome of the dice throw.

    13) If the "fake army" strategem is used against Cao Cao or Sima Yi, add 1 to Cao Cao or Sima Yi's dice throw outcome. For other strategems such as "ambush", the dice throw outcome of generals mentioned in the notes of the table is reduced by 1.

    14) When using the diplomatic relations counter to search for talent, simply place the general taking the action on an area of one's own territory to take the action.

    15) The starting positions and generals for non-human players are as follows:
    Territory Leader Employed Generals
    1 Yang Feng Xu Huang
    3 (Pei Cheng) Lu Bu Zhang Liao
    8 Gongsun Zan Zhao Yun
    10,11 Ma Teng Han Sui, Ma Chao, Pang De
    15 Zhang Xiu Jia Xu
    18 (Shou Chun) Yuan Shu
    The 6 generals, Zhuge Jin, Lu Meng, Lu Xun, Xu Shu, Pang Tong and Sima Yi start the game as free generals.


    Created March 16, 2013
    spotlightongames.com